I know it's been SOOOOO long since I posted a blog but here is just a shorty.
I started creating treasuries on Etsy recently and I did this one since I see very few that are geared towards kids. What better time to have a children's treasury than Christmas time!?
Take a second to check it out here: Kids' Christmas Treasury
Think outside the "Big Box" and shop handmade!
Wednesday, December 1, 2010
Sunday, March 14, 2010
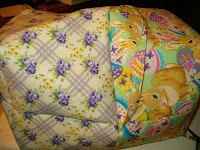
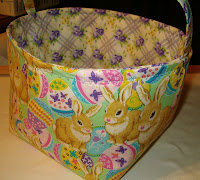
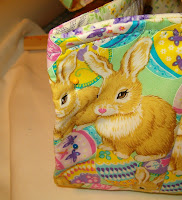
Easter Basket (Boxet) Instructions
Since I've had several people ask about instructions for making my Easter boxets I figured the best way to do this is to blog it. Anyone that has questions, please feel free to ask if something isn't clear. My apologies for the not-so-great pics but it was night time and my camera doesn't like the dark...and I had trouble getting them in exact order but it's close!
Here we go!
Materials needed:
cardboard or paper for template
1/2 yard of 44" wide fabric for lining
1/2 yard of 44" wide fabric for outer shell fabric
3/4 yard of heavy interfacing (you can use a double layer of thinner interfacing too)
(there will be enough fabric left over for your handles)
matching thread
sewing machine, scissors, iron and ironing board, etc.
Seam allowances are 3/8".
Step 1.
You will need to cut a template out of whatever suits you (cardboard, paper, etc.). This template measures 17-inches wide by 12-inches high so cut a rectangle using those measurements. Next, cut out a 4-inch square on each side of the bottom. This will later create a gusset and make the bottom square. For the handles you will need to cut a piece 20-inches long by 3.5-inches wide.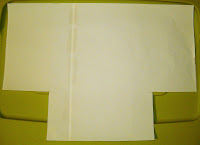
Step 2.
Using this template, cut out 2 each of the outer shell fabric, lining fabric and interfacing.
Pin the outer shell pieces right sides together and sew along each side and bottom...DO NOT SEW INSIDE CORNERS YET!

Lay down one piece of interfacing, then a lining piece with right side up followed by the next lining piece with WRONG SIDE up and finally the second piece of interfacing...pin all layers together. Sew down both sides but when you get to the bottom you will need to leave an opening for turning right-side-out later.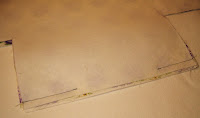

Step 3.
You will need your iron for this step for best results.
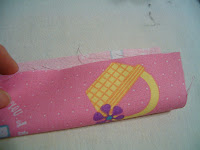
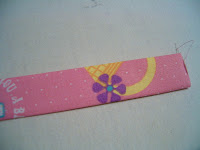
Using the handle template, cut out 2 each of either lining or shell fabric, whichever you choose. Fold first piece in half lenghtwise (wrong sides together) and press.
Unfold and bring both edges to center crease and press again. Fold in half lengthwise and press. Stitch down the lenght of both sides. (I used photos of a different handle that doesn't match the basket in the other photos.)

Step 4.
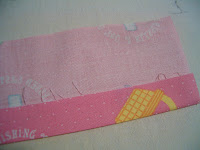
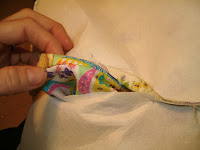
Line each end of handle up with seams and pin the handle in place and stitch (1/8" from edge) to shell on right side of fabric, reversing and going over a second time (see photo).
Step 5. On both the lining and the shell, fold corners in together, matching seams (see photos). This part is sort of hard to explain but hopefully the photos help. Press and pin together, stitch. Trim excess.
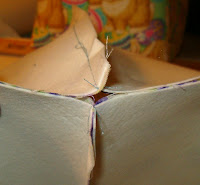


Step 6. Turn shell out so that right side is facing out. Turn lining so that interfacing is on the outside. Insert shell into lining, making sure to tuck handle in between shell and lining. Stitch all the way around the top. After stitching, trim away excess interfacing to reduce bulk.
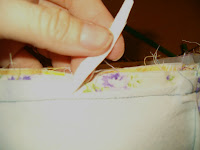
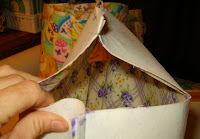
Step 7. Pull the shell through the hole in the bottom of lining, turning out to right sides. This part will take a litte patience but it will turn right side out. Stitch the hole in the lining closed.


Step 8.
Press each of the four sides and around the top seam before stitching around the top of basket.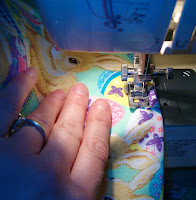


 Step 9.
Measure 4-inches from the side seam to the corner and fold. Press and pin, sew from bottom to top (1/4-inch from edge). This will create a box corner. Repeat on remaining corners.
Here we go!
Materials needed:
cardboard or paper for template
1/2 yard of 44" wide fabric for lining
1/2 yard of 44" wide fabric for outer shell fabric
3/4 yard of heavy interfacing (you can use a double layer of thinner interfacing too)
(there will be enough fabric left over for your handles)
matching thread
sewing machine, scissors, iron and ironing board, etc.
Seam allowances are 3/8".
Step 1.
You will need to cut a template out of whatever suits you (cardboard, paper, etc.). This template measures 17-inches wide by 12-inches high so cut a rectangle using those measurements. Next, cut out a 4-inch square on each side of the bottom. This will later create a gusset and make the bottom square. For the handles you will need to cut a piece 20-inches long by 3.5-inches wide.

Step 2.
Using this template, cut out 2 each of the outer shell fabric, lining fabric and interfacing.
Pin the outer shell pieces right sides together and sew along each side and bottom...DO NOT SEW INSIDE CORNERS YET!

Lay down one piece of interfacing, then a lining piece with right side up followed by the next lining piece with WRONG SIDE up and finally the second piece of interfacing...pin all layers together. Sew down both sides but when you get to the bottom you will need to leave an opening for turning right-side-out later.


Step 3.
You will need your iron for this step for best results.
Using the handle template, cut out 2 each of either lining or shell fabric, whichever you choose. Fold first piece in half lenghtwise (wrong sides together) and press.
Unfold and bring both edges to center crease and press again. Fold in half lengthwise and press. Stitch down the lenght of both sides. (I used photos of a different handle that doesn't match the basket in the other photos.)


Step 4.
Line each end of handle up with seams and pin the handle in place and stitch (1/8" from edge) to shell on right side of fabric, reversing and going over a second time (see photo).

Step 5. On both the lining and the shell, fold corners in together, matching seams (see photos). This part is sort of hard to explain but hopefully the photos help. Press and pin together, stitch. Trim excess.


Step 6. Turn shell out so that right side is facing out. Turn lining so that interfacing is on the outside. Insert shell into lining, making sure to tuck handle in between shell and lining. Stitch all the way around the top. After stitching, trim away excess interfacing to reduce bulk.


Step 7. Pull the shell through the hole in the bottom of lining, turning out to right sides. This part will take a litte patience but it will turn right side out. Stitch the hole in the lining closed.


Step 8.
Press each of the four sides and around the top seam before stitching around the top of basket.


 Step 9.
Measure 4-inches from the side seam to the corner and fold. Press and pin, sew from bottom to top (1/4-inch from edge). This will create a box corner. Repeat on remaining corners.
Tuesday, February 23, 2010
Apple Fritter Recipe

So I over did it on my produce shopping...I had about a dozen apples and needed to use some of them up. I decided to make some apple fritters because I remember my mom making those for us when we were kids. The recipe I found is different than what she made but they are still tasty!
I changed the recipe up a little to make it my own and it turned out so well I wanted to put it here on my blog. These are perfect in the morning with tea or as an afternoon nibble. A big plus is that they are easy to make!
APPLE FRITTERS
Dry ingredients
1 1/2 c. self-rising flour*
1 tbsp. sugar
1/4-1/2 tsp. ground nutmeg (optional)
Wet ingredients
2 eggs, beaten
2/3 c. milk
1 tbsp. oil
1 tbsp. lemon juice
1/2 tsp. vanilla extract
1/2 tsp. almond extract (optional)
3 c. peeled and chopped apples (about 3 medium apples)
In a small bowl combine the dry ingredients and set aside. Whisk together the wet ingredients in a medium bowl; tossing in the apples at the end. Gradually mix the dry ingredients into the wet until combined.
Heat 1-inch of canola or other cooking oil in a cast iron skillet. Bring the temberature up to 350 degrees, check using an oil/candy thermometer. You can also use an electric deep fryer and cook according to manufacturers instructions.
Carefully drop batter by spoonfuls into hot oil. Fry on first side about 1-2 minutes before turning and frying about another minute. You want a nice, deep golden brown. Remove to a wire rack with a baking sheet placed under it. Sprinkle generously with powdered sugar. ENJOY!
Makes 2-3 dozen, depending on size.
*If you don't have self-rising flour use 1 1/2 cups all-purpose flour, 2 tsp. baking powder, and 1/2 tsp. salt.
Friday, February 12, 2010
Easter Boxets (Baskets)

Okay, I just finished my latest project...Easter Boxets (baskets). They are a little bit of a change to the traditional looking Easter basket. I like them because they are collapsable and easy to store. The problem I always have with the baskets my kids get is they are clumsy and hard to store away easily.
I just listed three of them on Etsy today so please take a look!
Kiddie Shorts


I whipped up these shorts a couple weeks ago for my kids...I know summer seems a long way off to some of you. Here in the desert summer comes fast and brutally though so I'm getting a jump on it.
I had some remnant material that my daughter fell in love with (the dollies) and there was just enough for some shorts. The fabric for my son's shorts I bought before Christmas with the intention of a button up shirt but that never happened. Instead I've used it for shorts and I'm working on some Easter baskets too. The Easter baskets I will be listing on my Etsy store if anyone is interested. I like to call them "Boxets" because the look boxy but they are adorable!
Anyway, back to the shorts...they are super simple and quick to make. I just used a pattern that I had for elastic waisted pants and shortened them. And since both kids have about the same waist size it was even easier. All you need is fabric (I think I used about 1/2 - 2/3 yd for each pair) and about 18" of 3/4" wide elastic (for a size 3-5 child). It took about 20 minutes or so to make one pair. I would like to post the pattern but not sure how to go about that. I will have to look into it as I would love to share it with you all!
Well, I'm off for now...sew much to do and so little time!
Friday, January 29, 2010
Etsy Valentine Treasury....I'm in it!
I received a message from a fellow Etsy seller today informing me that I had been included in their treasury! I'm so excited about it because it's not everyday that someone chooses one of your items to go in a treasury.
Now we can only hope that Etsy will put it on the front page and we will all get lots of exposure for our stores! Follow the link below to check out this awesome treasury (mine is the HEART BLOCKS fabric gift bags).
TwentySix7's Etsy Treasury - Valentine..... Unique! The seller that created this treasury is TwentySix7 and here is a link to her lovely shop TwentySix7
Tuesday, January 26, 2010
Fingers are not for sewing
Okay, I've been using a sewing machine since I was about 6 years old. In all these years (I'm over 30 but under 40) I've never had an injury serious enough to draw blood...until today. But before I go on let me just say that I didn't need stitches nor was a trip to the ER required, thank God!
I use an old machine that is on loan from my step-mother and it belonged to her grandmother. I don't know the exact age but I think it's from the late 1950s or early 60s. It has straight and zigzag stitches, stitch size, reverse and tension control. I've heard of some of the newer machines having safety features that prevent your finger from getting near the needle. Probably something I could have used today.
I was sewing along one of the seams of this bag and it kept wanting to slide sideways. I kept stopping and adjusting the fabric to keep it straight. Well at one point I failed to stop the machine and that's when it happened. My finger became part of the project! I quickly took my foot of the peddle but of course the needle was in the down position. For a split second I had to remember which way to turn the wheel to raise the needle (shivers). I raised the needle raised and grabbed my poor throbbing finger.
As I examined my new puncture wound I was amazed that it wasn't worse. It just punched right through the fingernail, tissue and out the other side. A couple small drops of the red stuff and some intense, albeit short lived pain, and it was over! I poured a bit of peroxide on it, wrapped a band aid around it and was right back at the sewing machine.
So to summerize:
Practice sewing machine safety...always keep your fingers clear of the needle! DUH :)
Monday, January 25, 2010
I made it into an Etsy treasury...YAY! Mine is the Mango Sorbet yarn.
Strawberry Lemonade Treasury
The seller that created this treasury is OliviaOlivia and here is a link to their shop OliviaOlivia. Thanks Ladies!
Strawberry Lemonade Treasury
The seller that created this treasury is OliviaOlivia and here is a link to their shop OliviaOlivia. Thanks Ladies!
Friday, January 22, 2010
Well I've been working on more of my reusable gift bags this week...slowly but surely getting some put together! Seems like as soon as I sit down to start sewing I hear one of the kids yelling for me. My sewing "room" is upstairs so every time I have to take care of a situation...down the stairs I go. I think my knees are going to give out soon at this rate! :)
Anyhow, this is the latest set I finished and I'm getting ready to list on Etsy. I'm hoping for good picture taking light tomorrow so I get the the rest of them photographed too.
I was going to post a blog and recipe for some delicious 'Mango Tangerine Panna Cotta' I made the other day but the pics went bye bye. I guess I'll just have to re-make it...awwww, that breaks my heart! (NOT!) I was sooooo good if I do say so myself :)

Tuesday, January 12, 2010
Tried sewing a zippered pouch...
Well I bought some 4-inch zippers on Etsy several months ago and finally have time to try making some pouches. I bought a book the other day that has instructions on how to do a hidden zipper. The instructions are not for making a zippered pouch but are for creating a hidden zipper in clothing.
Sooooo, after following the instructions for insterting a zipper I winged the rest. The goal was to make a small coin purse and it is functional but the astetics are not what I had hoped. I decided to give it another try with a lighter fabric since the one I used before was a bit heavy. Still I didn't get the results I was looking for. So I am going to reach out into cyberland and see if someone out there can help....PLEASE!
Sooooo, after following the instructions for insterting a zipper I winged the rest. The goal was to make a small coin purse and it is functional but the astetics are not what I had hoped. I decided to give it another try with a lighter fabric since the one I used before was a bit heavy. Still I didn't get the results I was looking for. So I am going to reach out into cyberland and see if someone out there can help....PLEASE!
Friday, January 8, 2010
To tote or not to tote....

For Christmas I wanted to give my sisters-in-law all something useful but nice...and inexpensive but not cheesy. So I was shopping at a local fabric store during a sale and I found patterns for bags. I already had tons of fabric so I thought that would be the perfect thing.
So I purchased my items and left the store with the pattern and more fabric (what can I say, it's an addiction). It took me a while before I decided it was time to tackle the bags...and Christmas was fast approaching! So I glanced over the instructions and began cutting out all the pieces. That is my least favorite part. The tissue inevitabley tears at some point and it is so light that the slightest movement sends it flying around the room.
Okay, pattern cutting is done so now it's time to choose my fabrics and lining material. That was a bit more challenging than I thought. Trying to get the lining and shell to match and decide who would like what colors and prints. Well I finally made my selections and then it was time for my next favorite part (insert sarcasm here)...cutting the fabric. This isn't as bad as cutting the tissue patterns but still not my favorite part of this project. Once all my cutting is done I can now move on to what I consider the fun part...SEWING!
I like this part because I can really start to see things coming together. Whenever I make something the first time it usually seems to turn out better than the second one. I have no idea why this is but on my second I end up ripping out seams and redoing them because I sewed when or where I shouldn't have. So, my first bag gets done and I'm so proud of myself! I thought "wow, this looks like something that you would actually pay money for!" I've even created a few templates of my own that I am using for some of the bags & totes.
So with that in mind I decided I would try and make more now that the holidays are over. I sewed up a batch last week, took photos, uploaded them to picnik.com and made some minor adjustments. I spent the last couple of days listing them on Etsy (most of them basic totes and reusable gift bags) so only time will tell if they are worthy of being bought.
And just to note, my sisters-in-law all liked theirs :)
Thursday, January 7, 2010
Blog beginnings
Let me start by saying that I'm probably not the most entertaining blogger nor do I use eloquent metaphors. I think I do have a decent grasp on the English language however and can get my point across when needed!
I'll be honest, the main reason for starting my blog is the hope that it will drive more people to my Etsy and Ebay stores. I have been selling on Ebay for a long time and Etsy for almost two years. I've read of many sellers becoming much more successful after creating blogs. But to drive traffic to my online merchantiles isn't my sole reason for this blog. I also want to share/exchange patterns and crafting tips with my counterparts out in cyberland.
I have found so many unique and wonderful crochet patterns on blogs. My problem is I'm terrible at reading patterns and it takes me FOREVER to get through a new one...can you say A.D.D.? That is why I went to YouTube when I wanted to learn to knit. If I had relied soley on written instructions I would still be trying to figure out what casting on is!
Well I guess that's all for now so I'll close my first blog with a quote that I really like:
Those that are the most successful are also the biggest failures. The difference between them and the rest of the failures is they keep getting up over and over again, until they finally succeed.
Subscribe to:
Posts (Atom)
